
If you’ve been doing photography for any length of time, you know the truth: The more you photograph, the more your photo collection will expand – until pretty soon, you have a huge catalog of images and no good way to locate specific files.
That’s when photo keywording becomes critical.
By applying keywords to your images, you make it far easier to retrieve any image, even if it’s hidden deep in your archives. Want to share a snapshot on Instagram or print a stunning portrait? Looking to create a photobook or need to deliver a specific photo to a client? No matter the purpose, keywording can make a huge difference.
Yet it’s not enough to open your favorite image-management program, apply a few random keywords to each photo, and call it a day. Good keywording takes skill, and unless you want to spend hours each week in front of your computer, it takes a streamlined workflow, too.
That’s where I can help. As a longtime photographer, I know how difficult it can be to keyword effectively, and in this article, I demystify the entire process.
So stick around as I unveil the nuts and bolts of adding keywords to photos, share workflow tips, and introduce you to the time-saving wonders of AI keywording tools.
Let’s get started!
What Is Photo Keywording?
At its core, photo keywording is about using an image-management program to tag your images with descriptive text. Then, when you need to access a photo in several weeks, months, or years, you don’t have to scroll through endless grids of images; you can search for the relevant keywords, then quickly locate the file.
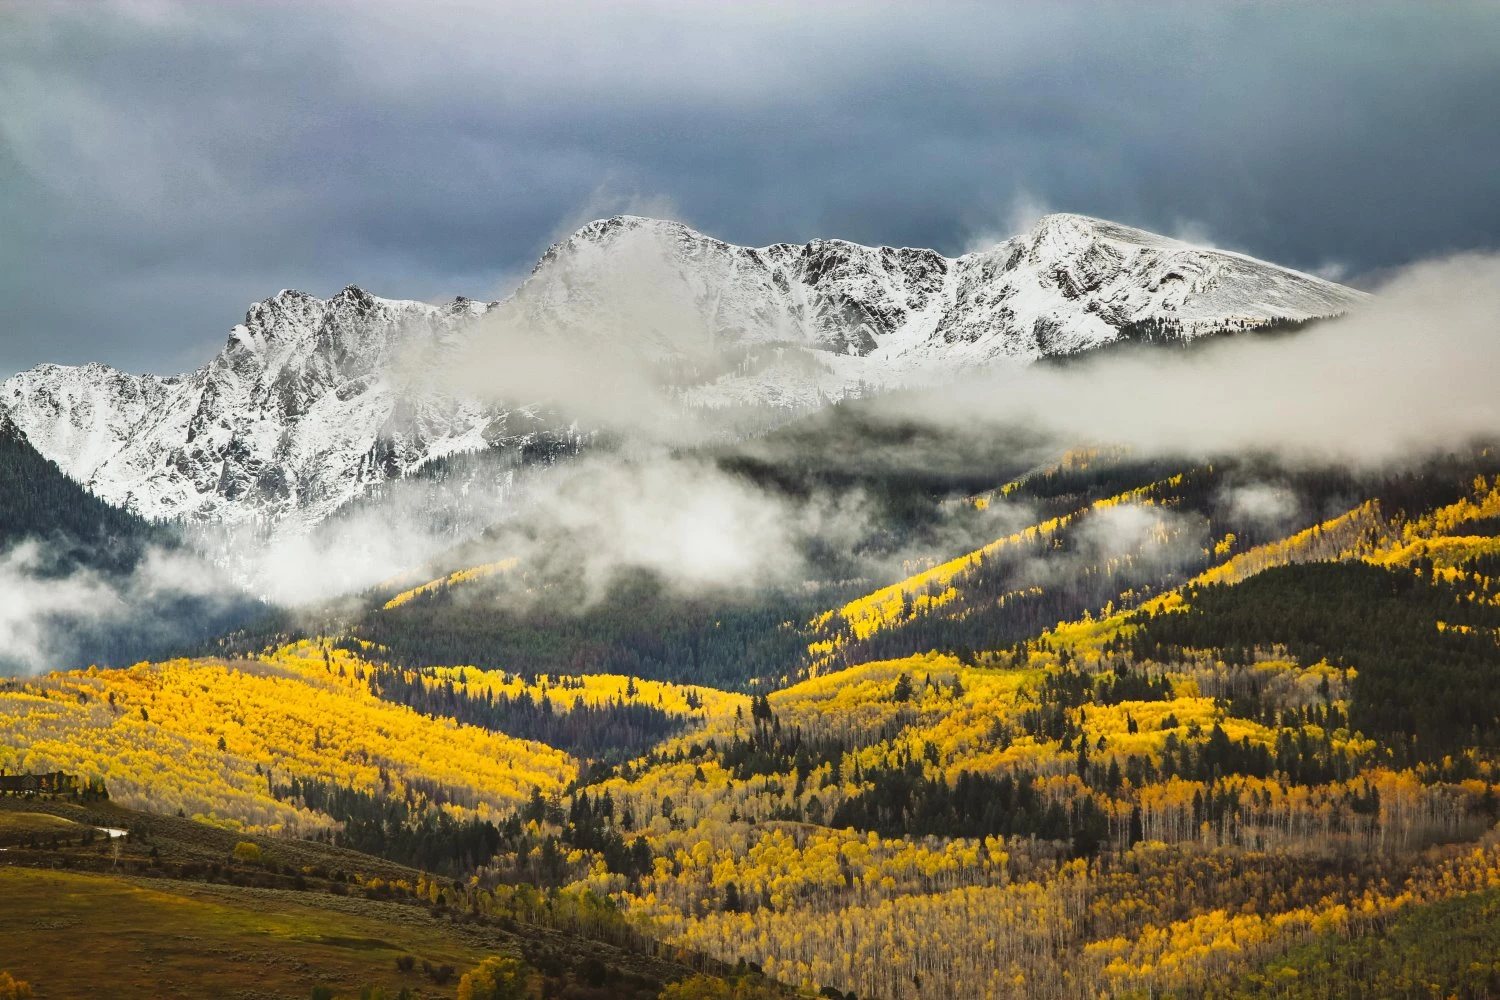
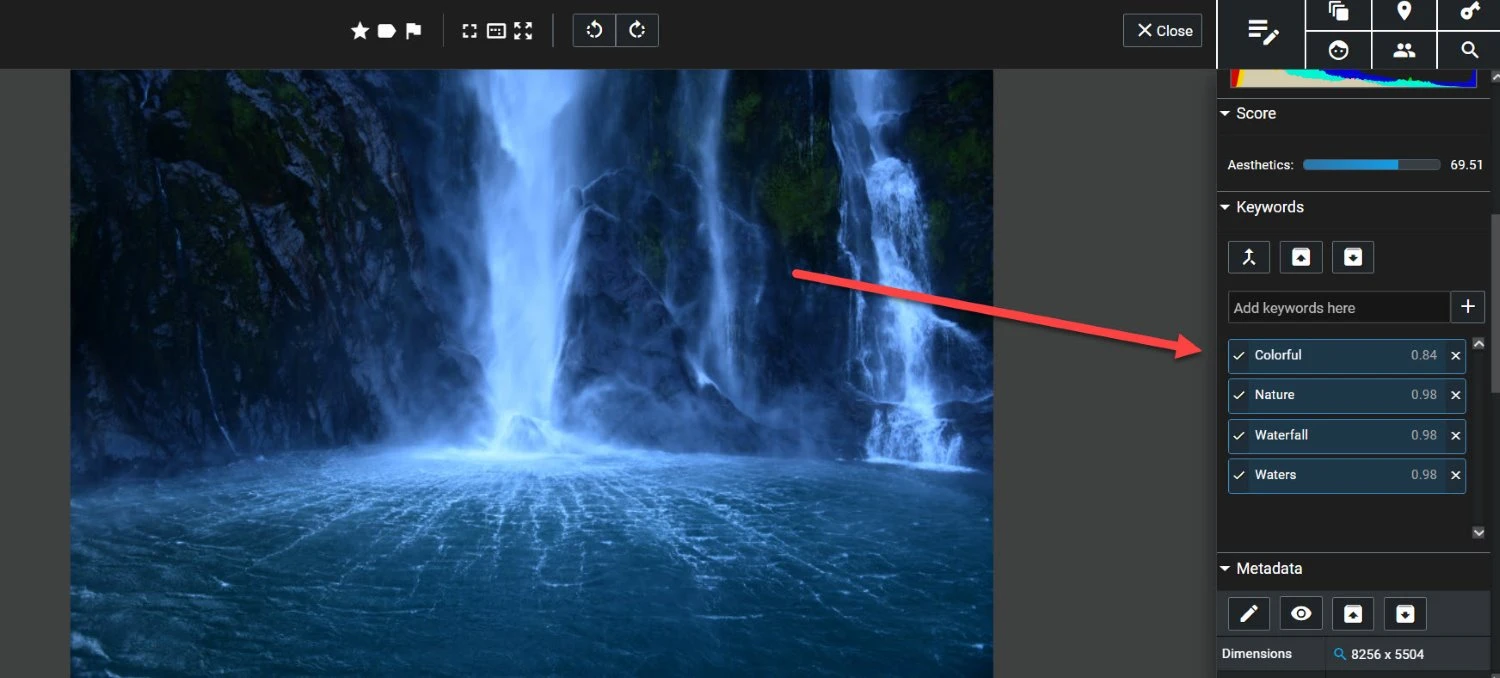
Say you capture the image displayed below, which features a gorgeous Coloradan forest with peak fall colors. You might head into your photo organizer and tag the image with a variety of keywords, such as “fall,” “forest,” “Colorado,” “landscape,” “mist,” “moody,” “mountains,” and “yellow.”
Then, the next time you want to share the image on social media or just reminisce about that incredible day in the mountains, you can quickly select the relevant keyword from your keyword list or type it into the keyword search field. Your search will instantly be narrowed down to just a few files, and from there, finding the image will be a piece of cake.
One note: While image keywording is done using a DAM program, the keywords aren’t simply stored within the program’s database. In most cases, the keywords are added to the image file itself or are stored in an associated sidecar file. That way, even if you switch your image-management software down the line, your carefully applied keywords won’t vanish into thin air. They’ll follow your photos – so you can always find what you’re looking for, no matter where your images are cataloged.
Why Is Keywording So Essential in Photography?
When you’ve just started out in photography, your library is manageable and you know where each shot is stored. Photo keywording seems like an extra chore that isn’t worth the effort – but as you capture more images, that perception changes fast.
Scrolling through a few hundred pictures to find the one you’re looking for might be feasible. But what happens when your collection balloons into thousands? Finding a specific photo becomes less like a stroll in the park and more like finding a needle in a haystack.
Not only is endless searching for images frustrating, but it can also have real-world consequences. If you plan to delve into time-sensitive photo projects, whether they involve paid or personal work, it’s easy to start missing deadlines because you can’t find the right files.
Fortunately, keywording reduces – and even eliminates – that risk. Once your photos are tagged, you can easily locate them by recalling any of their key details, and you can stay on top of your image projects.
Let’s revisit the misty Colorado forest example. Imagine it’s been several years since you captured the shot, and you can’t quite remember where you stored it. Without keywording, you may need to scroll through years‘ worth of photos – but if it’s tagged appropriately, you can just look under „forest,“ “misty,” and “Colorado,” and you’ll find it almost instantly.
Even if you organize your photos meticulously into folders or collections, keywording is still important. It’s more precise, it relies on words that are far more memorable, and you can often combine keywords and collections to locate images even faster. You may remember that you’ve stored the photo in a folder named “Landscape” or even “Rocky Mountain National Park,” but what if you’ve got thousands of landscape photos or you’ve been to RMNP dozens of times? Keywording cuts through the complexity like a hot knife through butter.
This is not just a tool for professional photographers. Whether you’re a hobbyist capturing family moments or an enthusiast who loves photographing on the streets, keywording is your ticket to a streamlined, stress-free photo-finding experience.
How to Keyword Your Photos: Getting Started

Once you’ve decided that keywording is the right decision for you (and in most cases, it definitely is!), now comes the part where you might ask, „How do I do it effectively?“
The short answer is: it depends. The best approach will depend on the type of photos you take, your reasons for cataloging your images, and the number of photos you take of specific subjects.
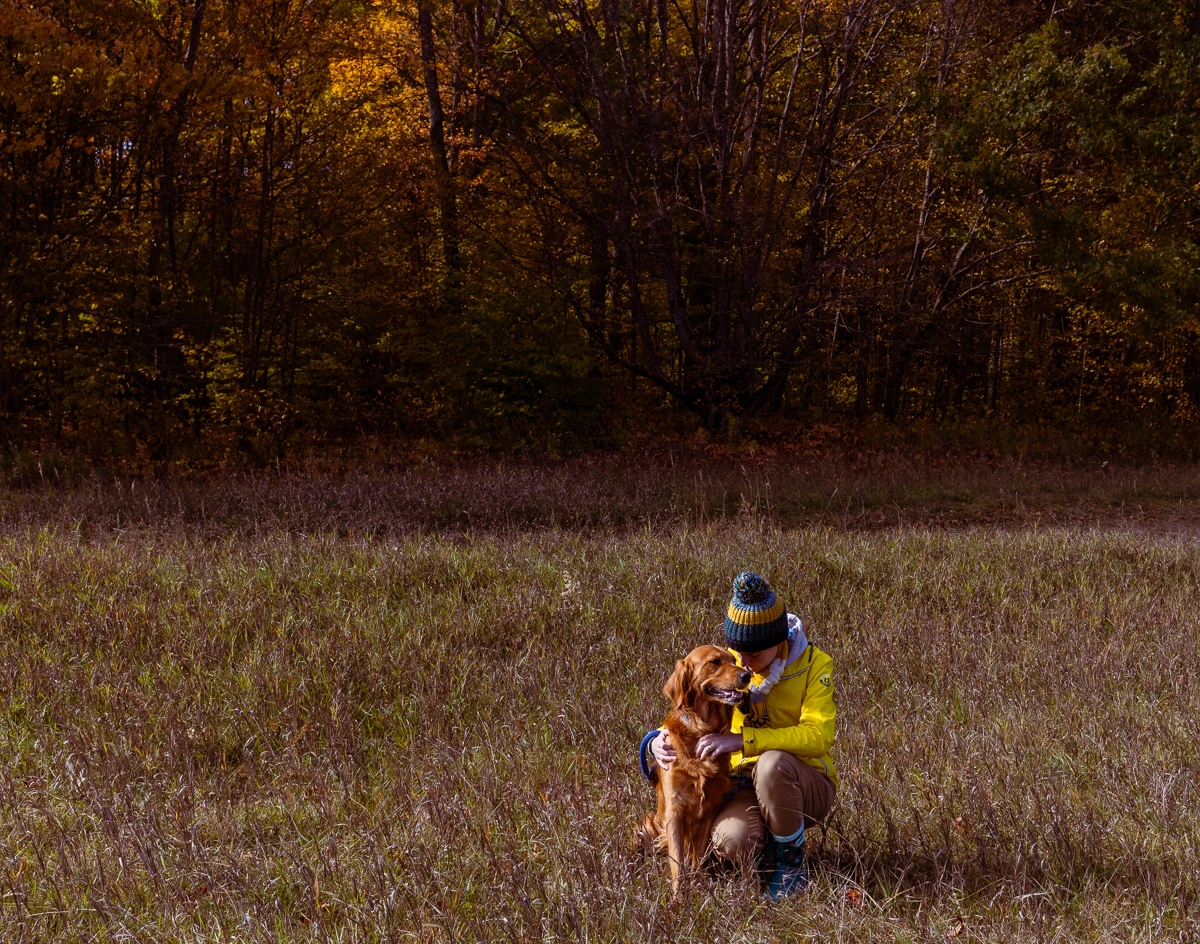
That said, I – along with many other photographers! – like to ask a handful of questions when keywording each image. To show you how it’s done, I’m going to use this image of a dog and a person posing in a field, which I took a couple of weeks ago in Gaylord, Michigan:
Here are the questions I recommend you ask when keywording each and every photo:
-
- Who? If there are people or pets in the photo, use their names as keywords. Even if your software uses facial-recognition search, it’s useful to add an additional layer of searchability. For my sample image, I’d use “Eri” (the dog owner’s name), and I’d also use the dog’s name, “Woody.”
-
- What? These keywords usually take the most time. You can start by looking at the primary elements in the photo, then get more specific. Here, “field,” “dog,” “trees,” and “grass” are good choices, as well as “Goldendoodle” (the dog breed).
-
- When? Here, we’re not talking about specific dates but rather more general time-related tags. Was the photo taken during the golden hour or perhaps in the harsh midday sun? Seasonal tags like „summer“ or „fall“ are also helpful. I’d use “sunset” and “summer” for my sample image.
-
- Where? This is about location. Naming parks, landmarks, or even streets can be a fantastic way to group photos. Think broader, too – city, state, and country names offer a different layer of searchability and can be especially useful if you photograph all around the globe. For my example, I’d use the tags “Gaylord” and “Michigan.”
-
- Why? Was there an event or a particular reason the photo was taken? Keywords like „wedding,“ „birthday,“ or „paid shoot“ can tell you the purpose behind the image. In this case, the image was captured on a family vacation, so I probably wouldn’t add any additional keywords.
-
- How? This is all about technique. Did you employ a specific style or use a particular lens? Tags like „macro,“ „long exposure,“ or „50mm lens“ can be very useful. Again, I’ve got nothing to add to my example image.
-
- Color? This is a less standard question for keywording, but I like to label dominant colors – just in case I’m looking for images to display on a particular background or next to a particular color. For my image, “brown“ would describe the grass, while „red” might describe the dog and the trees.
-
- Mood? This is another unconventional one, but it can be useful to retrieve images that are upbeat or gloomy, cheerful or sad. I’d label the example photo – with its loving owner and happy dog – as “nostalgic.”
I understand this list might seem extensive. But keep in mind that you can often batch keyword multiple photos that share common traits so you don’t have to run through the same list for every individual file (more on that later!). Plus, as you get more comfortable, you’ll find that selecting keywords becomes almost second nature, and that you no longer need to refer to the questions directly.
That said, keywording can still get pretty tedious, and it can take a lot of time. Fortunately, as I mentioned in the introduction, there’s actually a much more efficient way to handle keywording:
AI Photo Keywording Tools
Keywording may be about as exciting as watching paint dry, but advances in technology are giving photographers something to be excited about: AI keywording.
This cutting-edge approach uses AI models to identify features in each photo and automatically apply relevant keywords. It sounds complex, but it’s actually extremely easy.
Using a tool like Excire Foto 2024, you simply import your photos, and bam – the software auto-tags your images with an array of relevant keywords, which you can then modify or add to as needed. I’ve used it myself and found it remarkably efficient.
But what if the AI misses something? No worries. The best AI keywording tools offer manual adjustments, so you can easily add more specific tags, such as people’s names or particular locations.
Bottom line: If you’ve never used AI for keywording, you’re missing out on a world of convenience. You can start by downloading a trial version of Excire Foto 2024 – and once you’ve experienced the difference, there’s a good chance you’ll never want to go back.
(One final point: Excire Foto 2024 also offers a prompt-search AI feature, which can automatically find photos without keywording. Simply type a description of the image you’re seeking, and Excire’s cutting-edge AI will instantly process your query and output the relevant image. What’s especially cool about prompt-search AI is that you can type in more complex – even abstract – descriptions, such as „relaxing at the beach“ or „going on a trip“ and get the precise photo you were envisioning. For me, prompt-search AI has offered an alternative approach to image search-and-retrieval that’s actually better than a keywording workflow. Maybe it could do the same for you?)
Expert Tips for Effectively Keywording Your Photos
By now, you should be familiar with the keywording basics, but there are a handful of additional tips that can make your keywording process even smoother – so you can spend less time on the computer and more time behind the lens.
1. Avoid Including Gear and Settings Information

You might be tempted to go overboard with details when keywording your images. It’s easy to think that including information like the camera model, lens, and settings will be helpful, but in my experience, this is rarely the case.
In general, metadata filters in most image-management programs make it easy to access images based on metadata; for instance, Excire Foto 2024 offers robust metadata-based filters so you can locate images that were captured using, say, your Sony a7 III camera.
And remember, keywords should be easily memorable. You’re much more likely to recall that an image featured a „sunset“ than that you shot it at 1/200s, so spending time keywording different shutter speeds into your files probably isn’t worth it.
Note: Specific settings-based techniques, like a shallow depth of field, can be keyword-worthy. But you shouldn’t key in „f/2.8,“ but instead describe the effect – “shallow depth of field” – which you’re more likely to look for later.
2. Mix Both Broad and Narrow Keywords
When you first look at an image, the details tend to stand out. For example, if you’ve photographed a magnificent bald eagle, you might start by typing in that specific species of bird as your keyword – but while detailed keywords are helpful, you shouldn’t overlook the power of applying broader keywords, too.
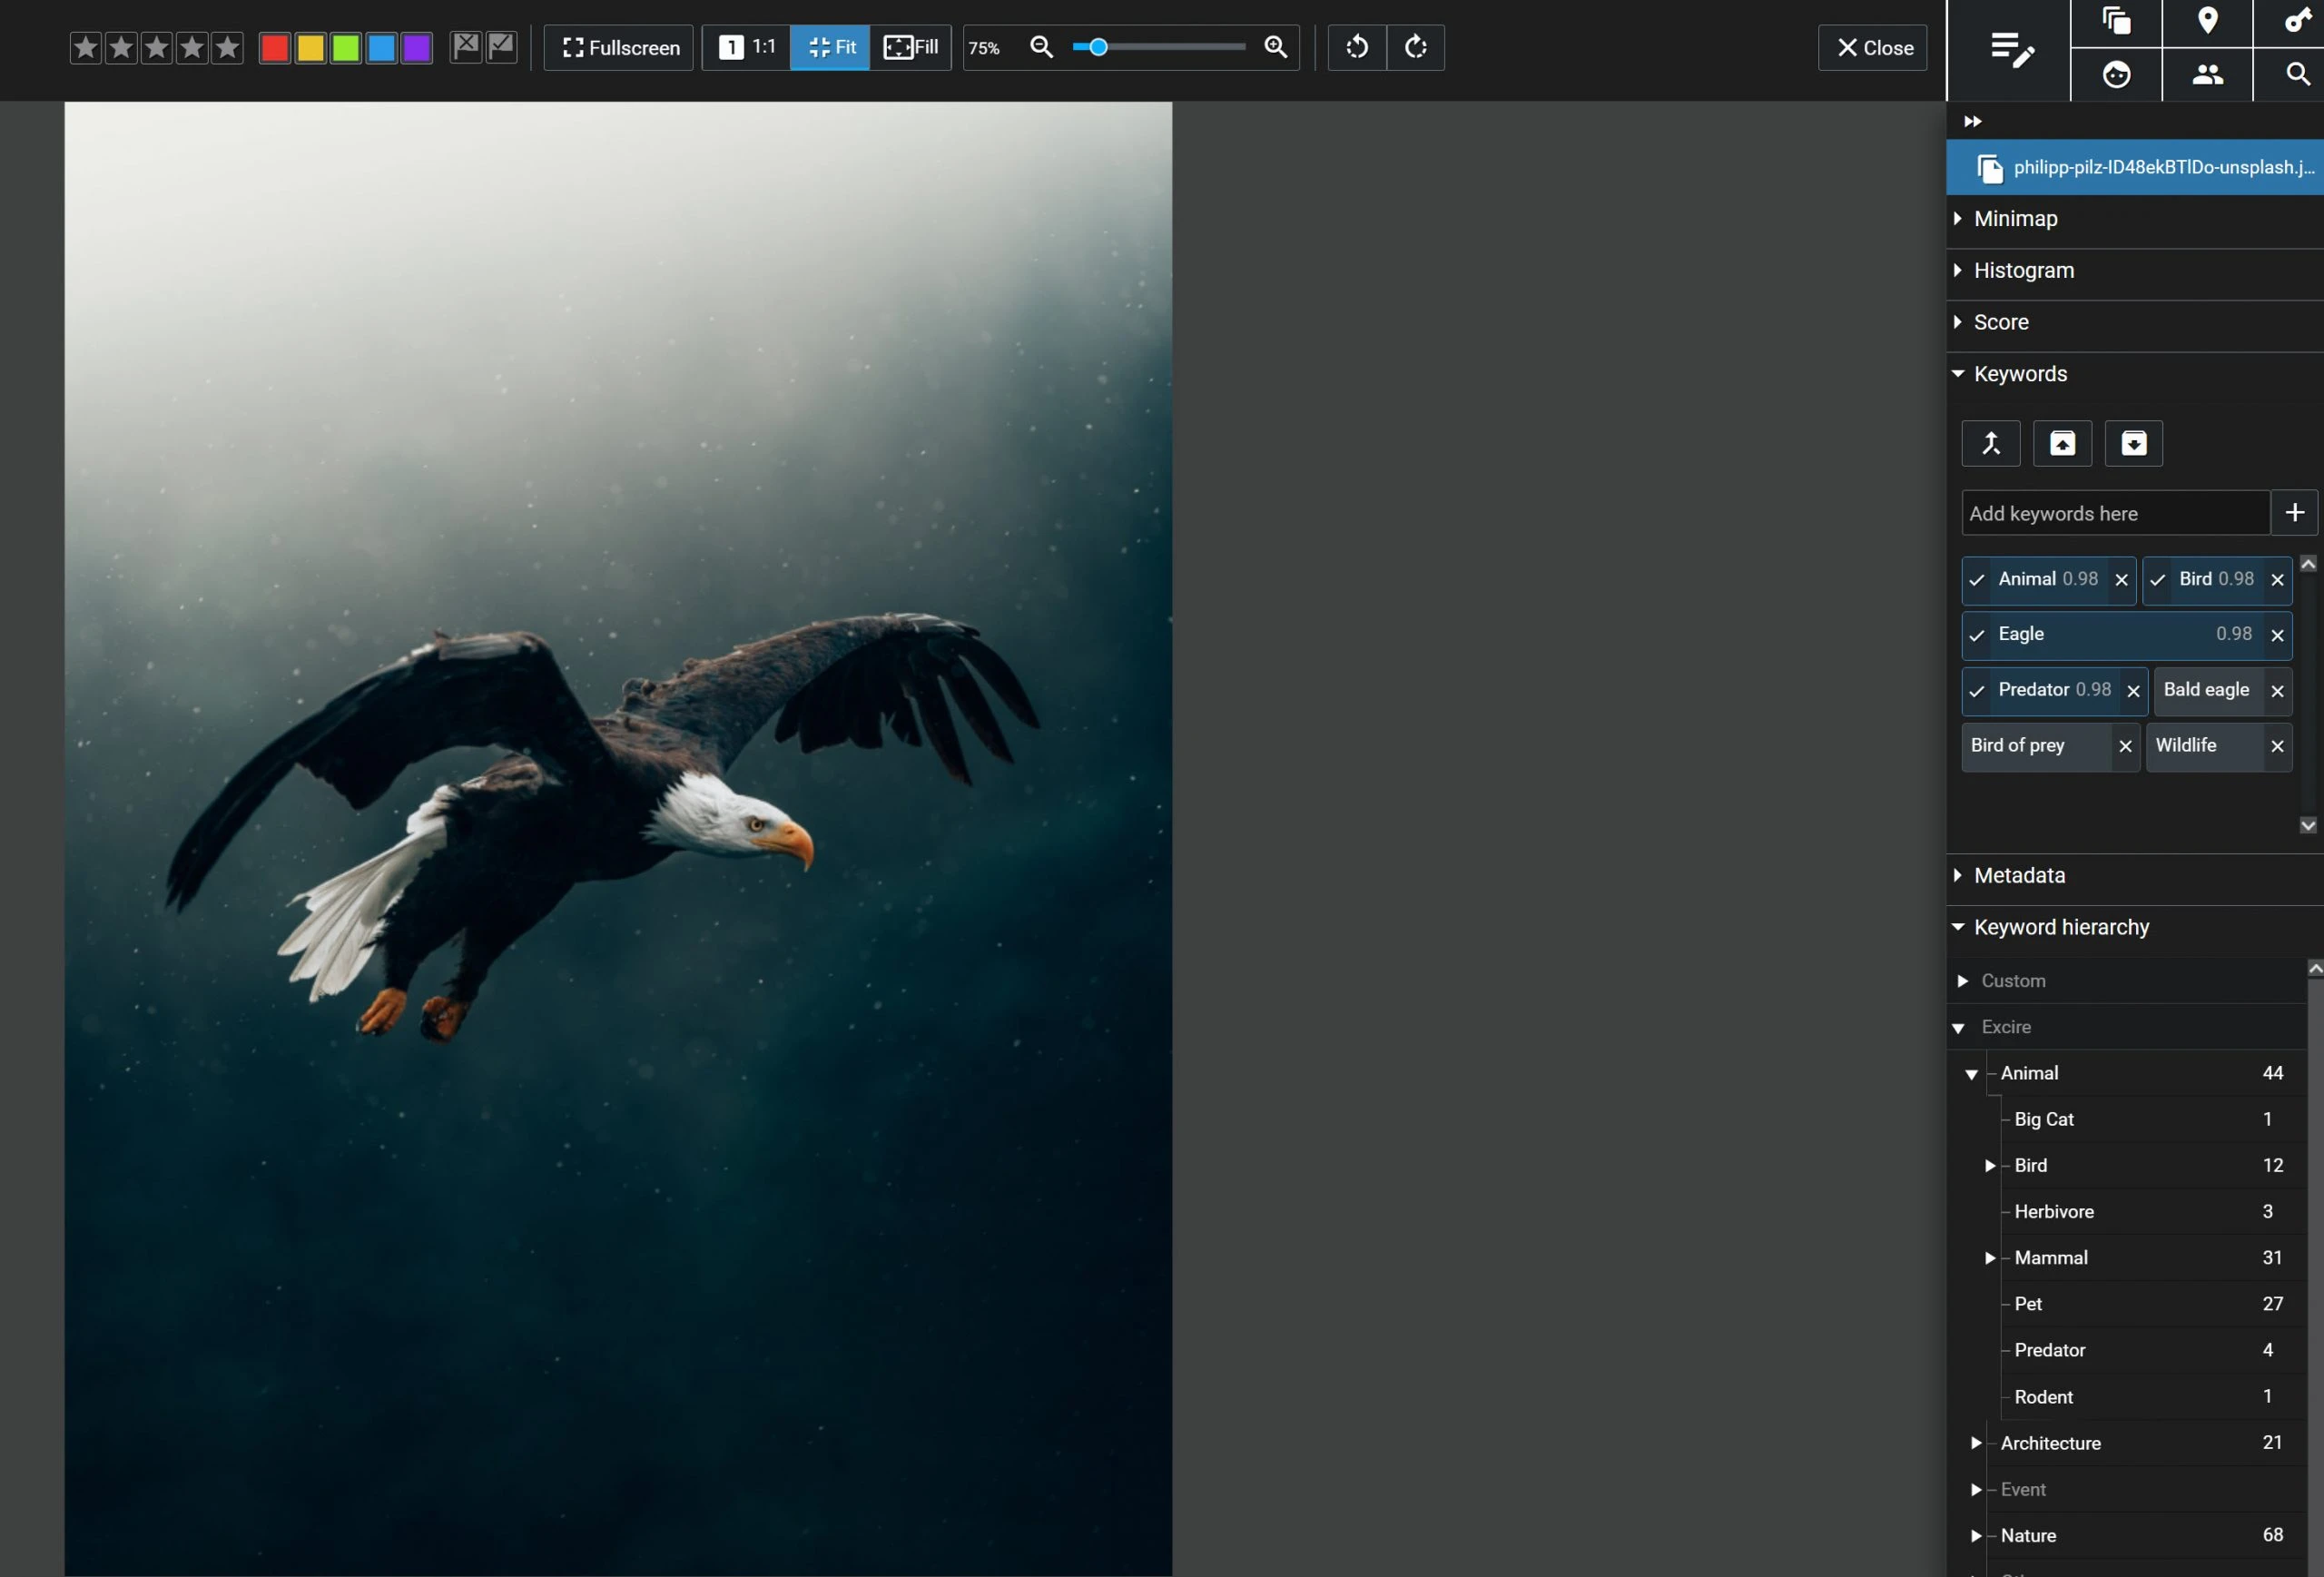
By employing a combination of keywords, you’ll gain easy access to both broader and narrower sets of photos. To use my example: in addition to „bald eagle,“ you might add a more general term like „bird of prey“ and even broader terms like „bird“ and „wildlife.“
As a result, you’ll have more flexibility when conducting future searches. Maybe you’ll need an image of any bird of prey for a project, or perhaps you’ll just want to view all your wildlife photographs; regardless, thanks to a combination of broad and narrow keywords, your searches will be more efficient.
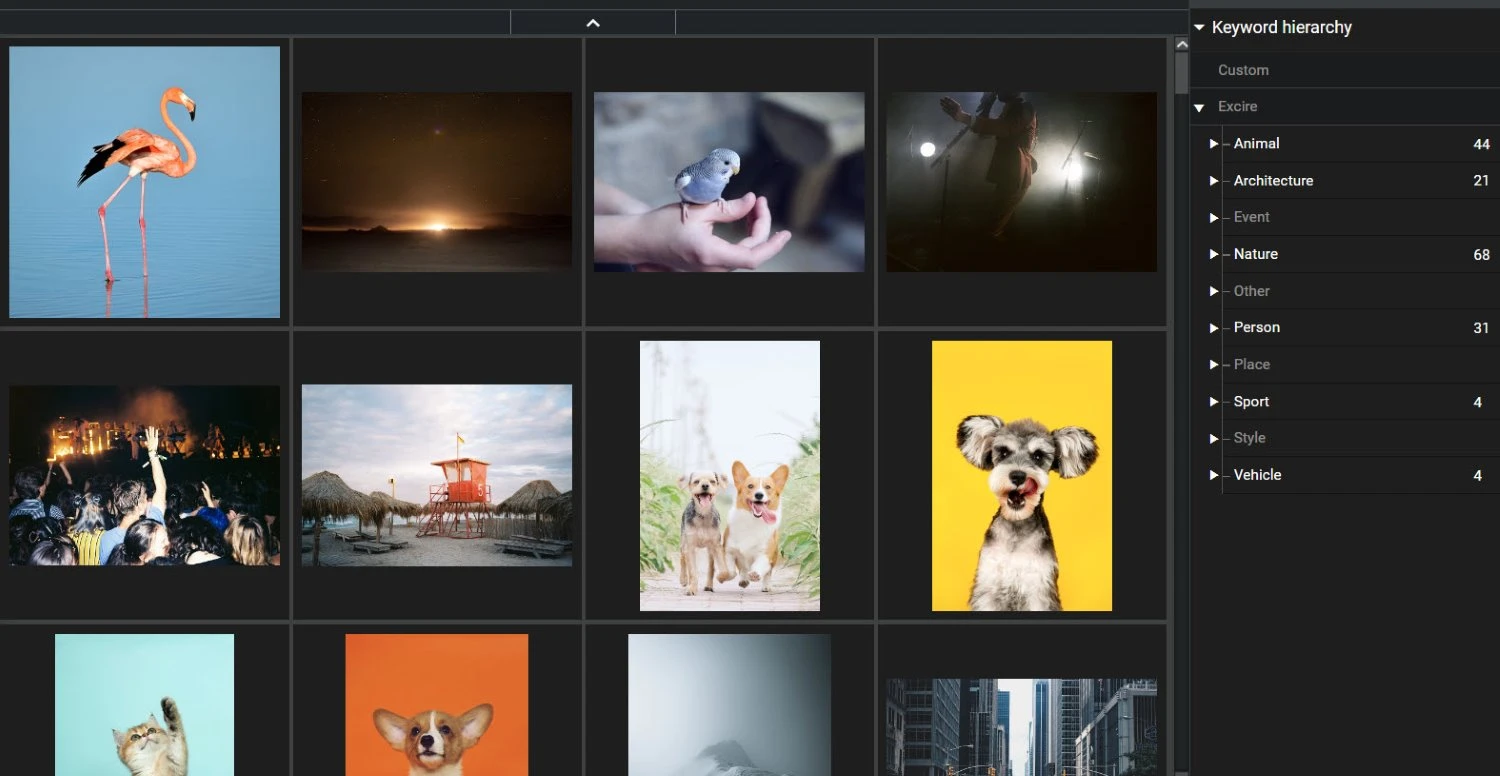
3. Organize Your Keywords Into a Hierarchy
If you’ve taken my previous advice to heart, your keyword list is probably growing, and that’s a good thing. However, a long list of keywords can get messy, which is why keyword hierarchies are so important.
A hierarchical keyword structure allows you to nest narrower keywords within broader categories. If you’re an avid wildlife photographer, for instance, the broad keyword „animal“ can contain keywords such as „bird“ and „mammal.“ Then, beneath mammals, you can include the keywords “bear,” “wolf,” “fox,” and so on – and then beneath those keywords, you can add specific species.
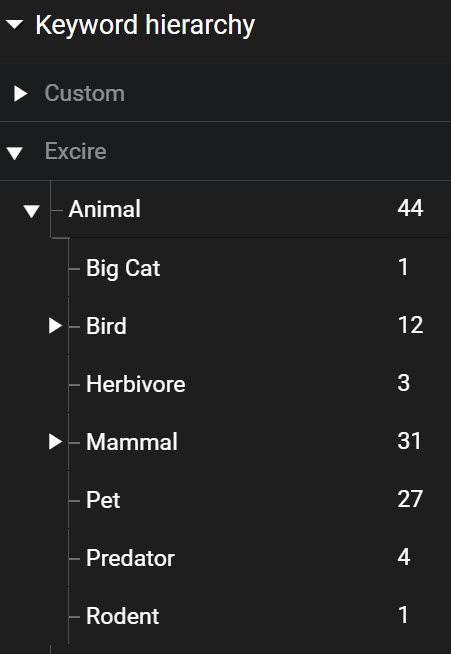
That way, you’re not stuck with an unwieldy list of keywords, but you’re instead working with a well-organized system that’s intuitive to use.
Many image-management programs offer this hierarchical functionality. If yours does, use it. It works especially well with the broad-to-narrow keywording strategy I shared above, and it keeps your workflow smooth. Plus, a clean, tiered system will save you time when you’re hunting for that perfect shot.
4. Keep Your Keywords Consistent
I get it; you’ve got a sprawling catalog of images, and you don’t want to spend extra time agonizing over little details like capitalization and singular vs plural. But hear me out: maintaining uniformity in your keywording practices pays off in the long run.
For instance, if you use „landscape“ for one set of photos, resist the urge to switch to „landscapes“ for another batch. Stick to one or the other. This way, when you search for „landscape,“ you don’t miss out on great shots because they were tagged differently.
A helpful trick is to jot down a set of standard keywords or keyword rules. Tape that list to your desk or stick it on the wall behind your computer, and refer to it whenever you sit down to tag a new batch of files.

Regular clean-ups can also help. Every once in a while, skim through your keyword list. Merge similar terms, get rid of outliers, and refine your hierarchy. Some regular housekeeping can save you a lot of searching down the line.
5. Do Batch Keywording as Much as Possible
If you’re manually keying in words like „portrait,“ „summer,“ or „sunset“ for every single photo from a shoot, you’re probably wasting time.
Most image-management software has an option to apply keywords in batches, and it’s incredibly handy. In Excire Foto 2024, for example, you can select multiple photos, type in a keyword, and hit the „+“ button. Then it’ll be applied to all the selected files.
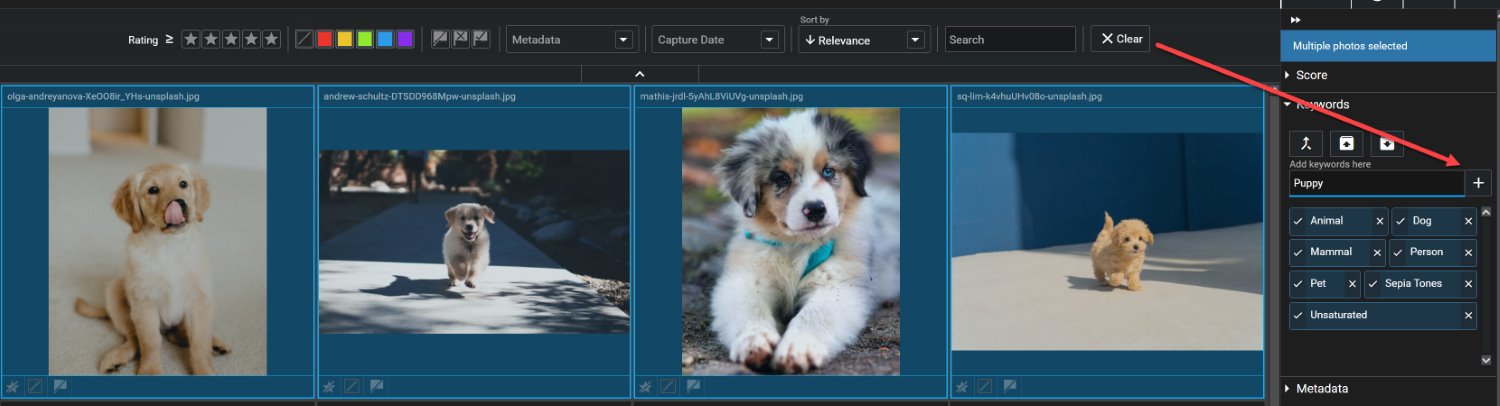
How is this useful in practice? Let’s say you’ve spent an evening taking portraits at a park, and you now have 260 files to keyword. With a batch keywording tool, you can tag every photo with general descriptors, such as the subject’s name, the location, „portrait,“ and “sunset.” These broad keywords will apply to all the photos in the batch and will help you avoid a lot of tedious work.
Of course, you’ll need to come back to add more specific keywords. But starting off with batch keywording frees you up to focus on those unique descriptors – no more typing the same words over and over!
6. Add Keywords After Every Photoshoot

Keywording is a lot like laundry – if you let it pile up, it becomes an overwhelming chore. So as hard as it can be, don’t procrastinate.
Specifically, it’s important that you add keywords as soon as possible following a photoshoot. Sure, after hours of shooting, keywording might be the last thing you want to do. But trust me, the sooner you get it done, the easier your life becomes. You don’t want to mix up details later, especially when dealing with clients or specific locations. It’s much easier to recall the key elements of your shoot while they’re still fresh in your mind.
Regardless of your photography niche – be it portrait, landscape, travel, or product photography – make it a rule to apply keywords as soon as possible. Consistency here will save you from a mountain of unpleasant work down the line.
7. Use AI Keywording Tools to Make the Process Faster
I’ve mentioned the perks of photo keywording with AI elsewhere in this article, but it’s such a big deal that I’m going to reiterate: If you haven’t jumped on the AI bandwagon yet, you’re missing out big time.
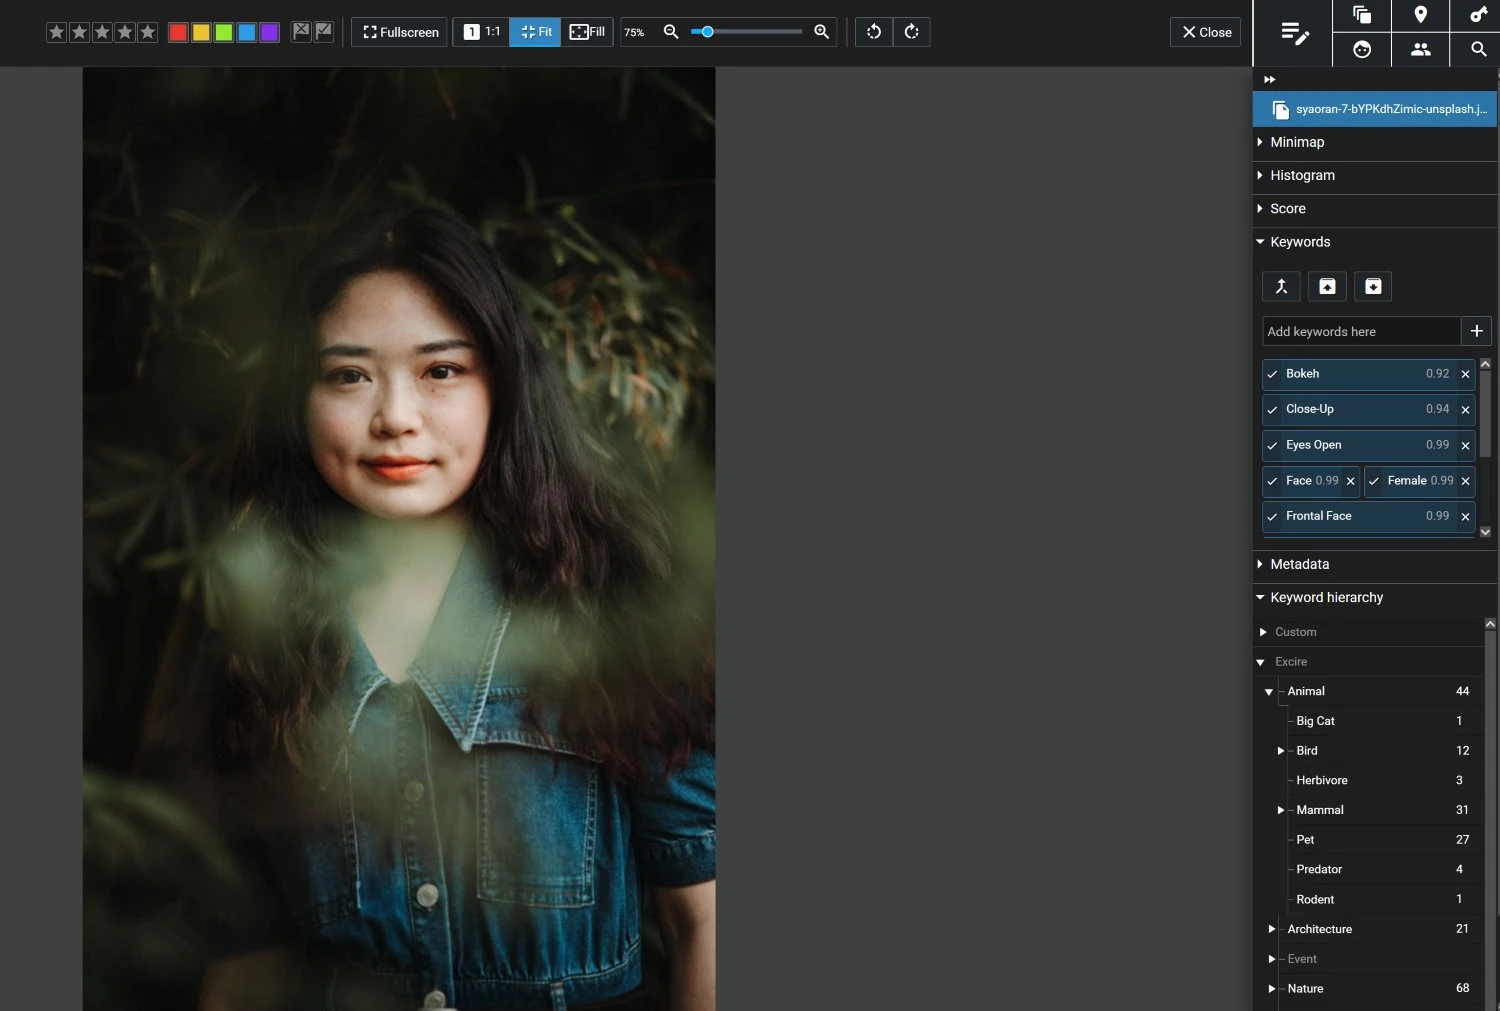
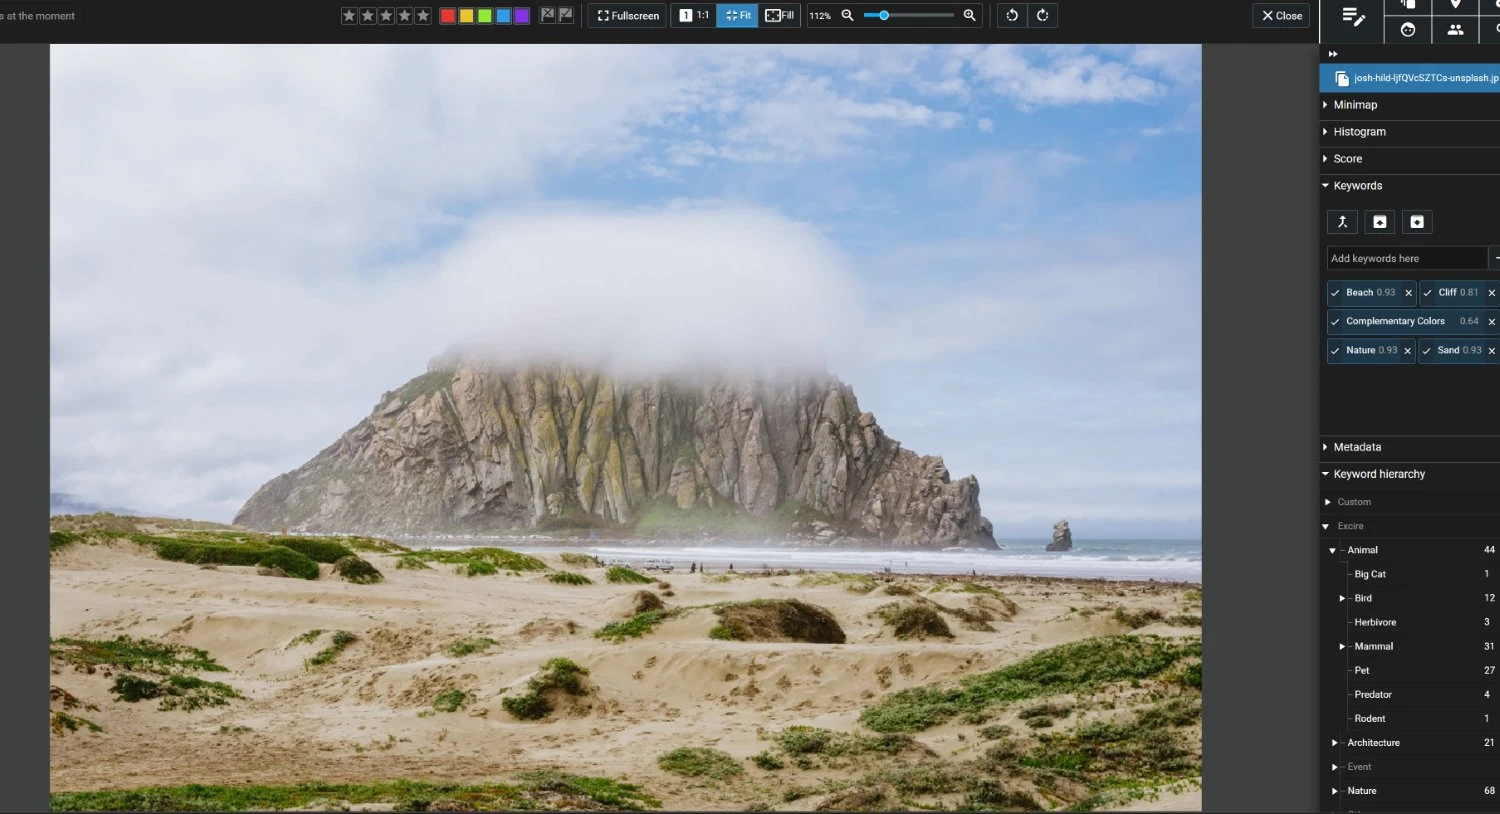
Take Excire Foto 2024, for example. The software doesn’t just slap on generic keywords – instead, it analyzes your photos, and applies the kind of tags that you’d apply on your own. It can even recognize nuanced elements in photographs, such as „bokeh” and “complementary colors.”
What’s the catch? Honestly, there isn’t one. Even if the software makes a mistake, it’s designed so you can easily remove any inaccuracies. As a result, the time you save can be monumental, freeing you up to focus more on the tasks you enjoy (such as photography!).
How to Keyword Your Photos: Final Words
Mastering the art of keywording might not give you the same thrill as capturing that perfect shot, but it’s a fundamental skill that every photographer should have in their toolkit. And hopefully, now that you’ve finished this article, you’re well-equipped to apply keywords across your entire photo library.
Remember: With the right approach – and the right AI photo keywording tool – you can make the process a lot more manageable and efficient. Because at the end of the day, photography isn’t just about the moments you capture; it’s also about being able to find and share those moments with the world.
So have fun, and happy keywording!